We store up to twelve months of cablelynx Digital Phone call detail records. Options are available to search on the date of the call, day of the week, time of day, city called, state called, number called, call duration, and call total charge.
Calls can be searched, filtered, and exported to Excel, PDF, CSV file, or Word.
To search call detail records:
- From the navigation menu select DIGITAL PHONE / Search Call Details or from the phone number management page, click the Search Call Details button or Search Icon.
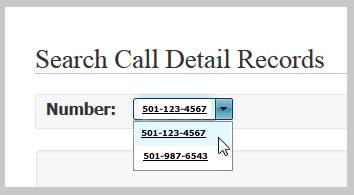
- If you have more than one cablelynx Digital Phone number, select the phone number from the Number drop down selection box.
- Enter any search values in the search boxes provided.

- Click the filter icon next to the search box to filter the call details.

Examples:
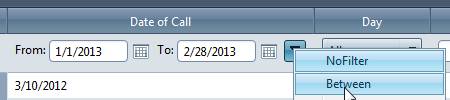
To search on all calls made between 1/1/2013 and 2/28/2013, enter the From and To date ranges, click the Filter icon, and then select the Between filter option:
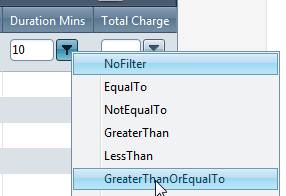
To search on all calls lasting 10 minutes or more, enter 10 in Duration Mins, click the Filter icon, and then select GreaterThanOrEqualTo filter option:
- If you would like to export the call details to Excel, PDF, Word, or CSV file, click Preview to Export. Then click one of the Export to icons.
- To exit Preview mode and clear all filters, click Refresh.
Top